
One of our favorite local places is Green Spring Gardens, a free public park in Alexandria, Virginia (www.fairfaxcounty.gov/parks/greenspring/). We had a sunny day and decided to try to take panorama shots of the main areas in the gardens. To make the panoramas a little more interesting, we decided to process them in polar form. We used the polar coordinates filter of Photoshop (Filter->Distort->Polar Coordinates) to create a circular image that seems to wrap around like a planet. We have included four images we made from photos of the garden. After looking at the first, the photographic considerations and processing steps are described.
This is the main lawn of Green Spring Gardens. The visitors’ center is seen at about 10 o’clock and a gazebo (sometimes used for weddings) is seen at 2 o’clock.
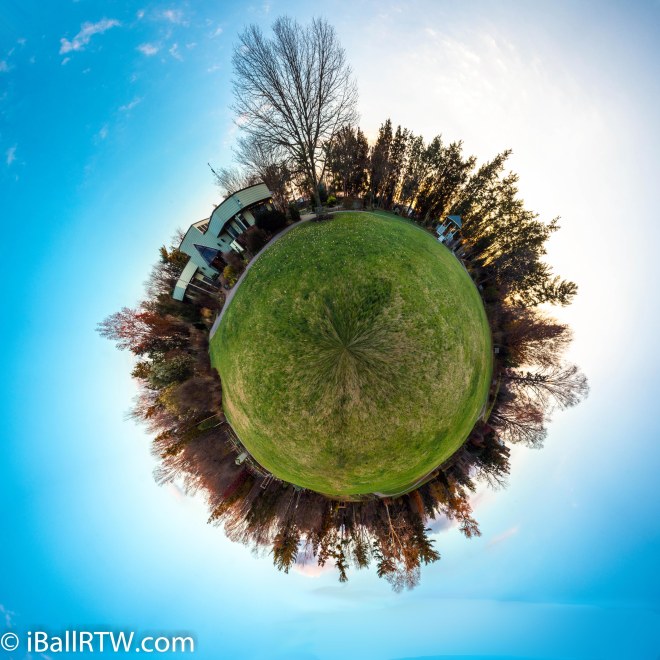
One key to a good polar panorama is to find an area where there is some symmetry, as was the case in the photo of the main lawn. We took this photo by standing in the center of the lawn and mounting the camera on a tripod in portrait mode with a wide angle lens. We needed to scan the 360 degree circle of the panorama through the viewfinder to make sure there was clear sky above the trees at every angle. (A branch touching the top of the photo would ruin the panorama.) We then rotated the camera to take pictures every 30 degrees, taking 12 shots. It is best to do this in manual mode including manual focus to maintain consistency between the shots.
(Even More Technical Note: In landscape mode, the field of view [FOV] for this camera [APS-C 1.6x crop factor sensor] with the 10 mm focal length lens that we used is 97 degrees horizontal and 76 degrees vertical. Since the camera was tilted into portrait mode, the FOV angles were reversed, resulting in 76 degrees horizontal and 97 degrees vertical. This gave us more sky per image at the cost of less horizontal overlap between images.)
When we got home, we converted the photographs to JPEG using Lightroom and imported them into Photoshop. We then generated a standard panorama using the File->Automate->Photomerge.. menu (this was in the CC version — for other versions do a web search for “Photoshop Panorama” to find the correct menu item) then adding the twelve files to the list in the dialog box and checking the “Content Aware Fill Transparent Areas Box.” After a moderate delay, a linear panorama was produced. The panorama showed the same objects on the far right and far left because of the overlapping field of view of the lens. We used the crop tool to remove the duplicated portion of the image.
Once the linear panorama had been created and cropped, the conversion to polar form could begin. Selecting Image->Image Size… from the menu opened the resize dialog box. In the dialog box, we set the Height and Width to the same value (the smaller of the two values because the image was now quite large). The result was a square image that was “stretched” in the vertical dimension.
Since Photoshop’s polar distortion wraps an image around the center of a photo at its top, the “ground” of the image needs to be at the top and the sky at the bottom. To do this, we selected the Image->Image Rotation->Flip Canvas Vertical menu items. At this point, we had a vertically-stretched image that was upside down.
The final step is the actual transformation. That’s when we finally used the Filter->Distort->Polar Coordinates command that was mentioned when this (rather long-winded) discussion began. After a wait time that depended on our processor speed, a (hopefully fantastic) polar panorama was displayed.
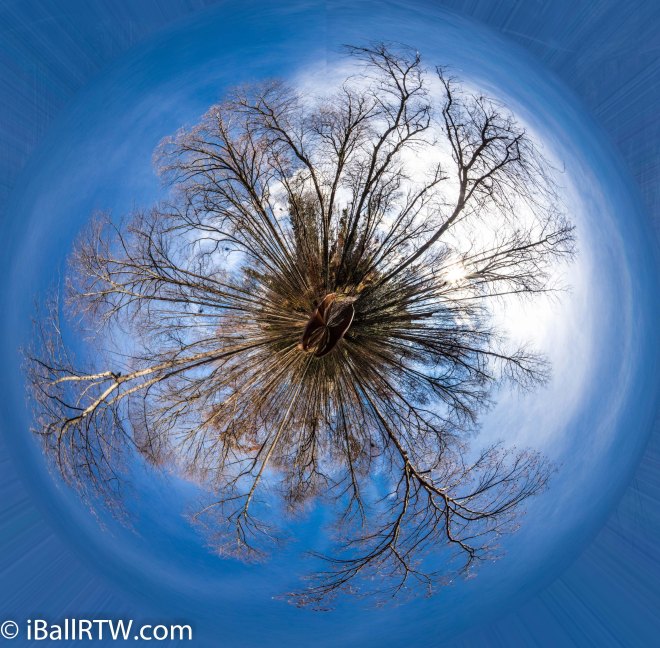
Here is another photo taken in the gardens while standing in the center of a small bridge crossing a stream. The bridge is in the center.
Another panorama was taken from the same bridge at exactly the same spot. The only difference between the photos is that the camera was pointed down to catch more of the bridge railing. Also, since we could not get clear sky at the top of the photos at that camera angle, we used the repeating patterns of the boards on the bridge as our “sky.” (The real sky is in the circle in the middle of the resulting image.) Since the boards were already at the bottom of the linear panorama, we simply omitted the Image->Image Rotation->Flip Canvas Vertical step in our processing. The stream flowing beneath the bridge can be seen through the railings on either side.

Here is a final image of the park taken while standing on another bridge. The bridge is the “butterfly” in the center of the photo. A careful examination will reveal the two ponds on either side of the bridge, as well as a small gazebo at around seven o’clock.
 Green Spring Gardens: Sky View from Pond Bridge
